How to Create a YouTube Series Thumbnail Template

YouTube algorithms love to promote content creators whose videos viewers will watch back to back to back. A great way to incentivize viewers to watch your own content this way is by creating a series for your videos so that viewers can watch your journey much like they binge-watch hit tv series.
While YouTube has a playlist feature to group your series together, it can be hard for new viewers to know to start at the beginning if they are introduced to a video halfway through unless a clear, consistent video thumbnail shows them the way.
How to Build a YouTube Thumbnail Template
If this is your first time making a custom YouTube Thumbnail, you can use the YouTube Thumbnail Maker to get used to building thumbnails on a properly sized canvas. But if you feel comfortable with our templates, why not make your own in our Graphic Designer?
Step 1: Open a Blank Canvas
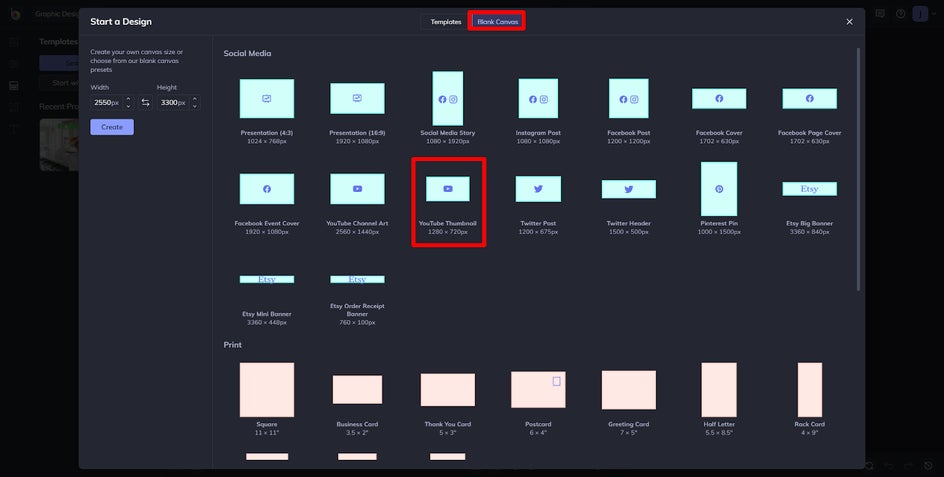
To create a YouTube thumbnail template, open the Graphic Designer, where you'll be prompted to start a design. From the Blank Canvas tab, click YouTube Thumbnail 1280x720px. This will set up your canvas to be the perfect size for a YouTube thumbnail.
Step 2: Add a Screenshot From Your Video
Navigate to the Image Manager tab on the left side of the Graphic Designer. Click the blue Computer button to access images saved to your computer. You should have a screenshot or plain thumbnail from your video saved to your computer to access here. Once the image is opened in the Graphic Designer, double click it from the images below, or right-click it and select Add as Layer. This tutorial will show a home remodeling series by using images of renovated rooms, but any type of series can be made in this way.
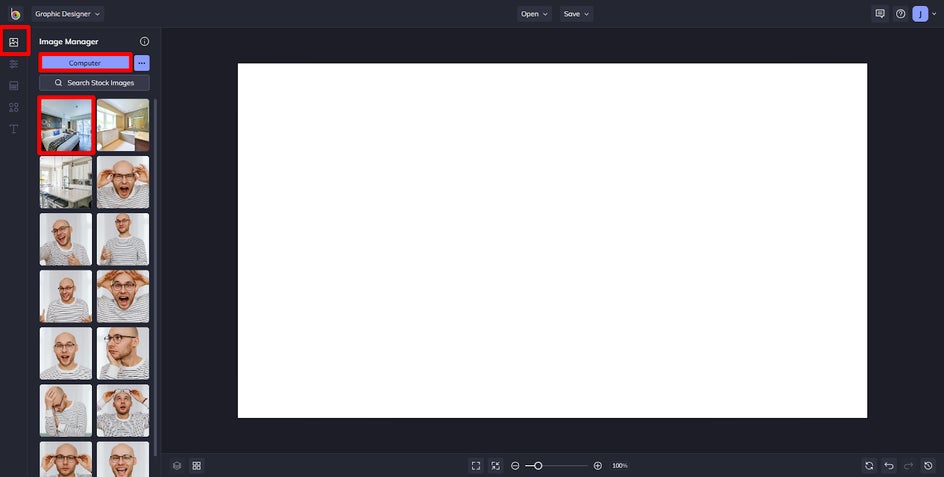
Once the image is added to the canvas, right-click it on the canvas and select Canvas > Fill Canvas from the dropdown menu. This will resize the image to fill the entire canvas and your thumbnail will not have any pesky white space around the edges. This is also a good time to use the blue Edit Image button to make any photo edits necessary to the video screenshot.

Step 3: Add Emotion
A great way to build interest in a video before the viewer watches it is by giving them a reason to become emotionally invested in the outcome of the video. This can be done by adding an expressive emotion in the thumbnail.
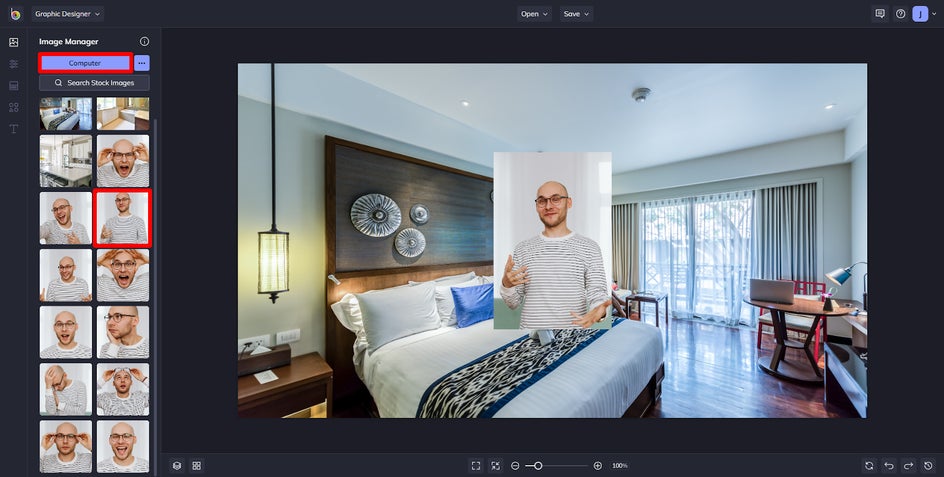
The video used for this tutorial will be titled “My Finest Bedroom Remodel,” so we will use a photo where our YouTuber looks proud. Again, we will add the image by clicking the Computer button, adding the image from the computer, and double-clicking it.
Step 4: Cut Out the Image
This time, we will move the image to the bottom right of the canvas and drag the bubble at the top left of the image to make it big enough canvas to see when the thumbnail is small. Next, click the Cutout button to isolate the subject.
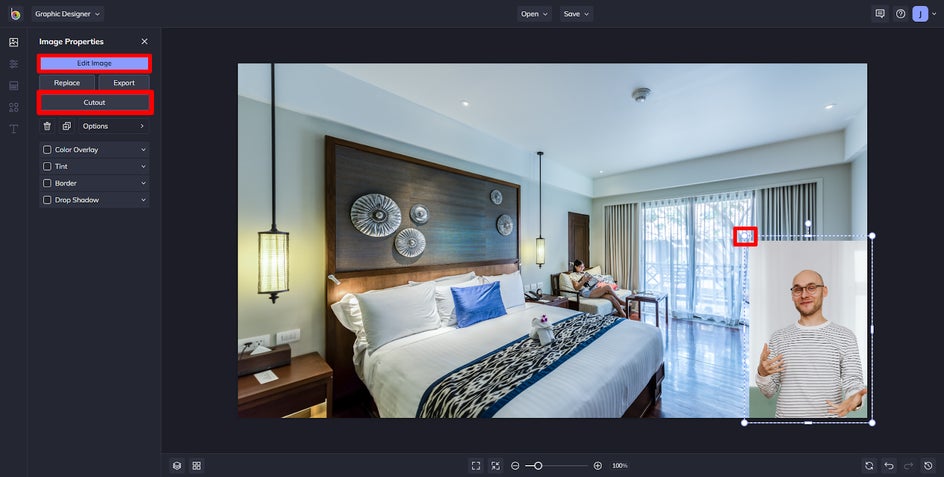
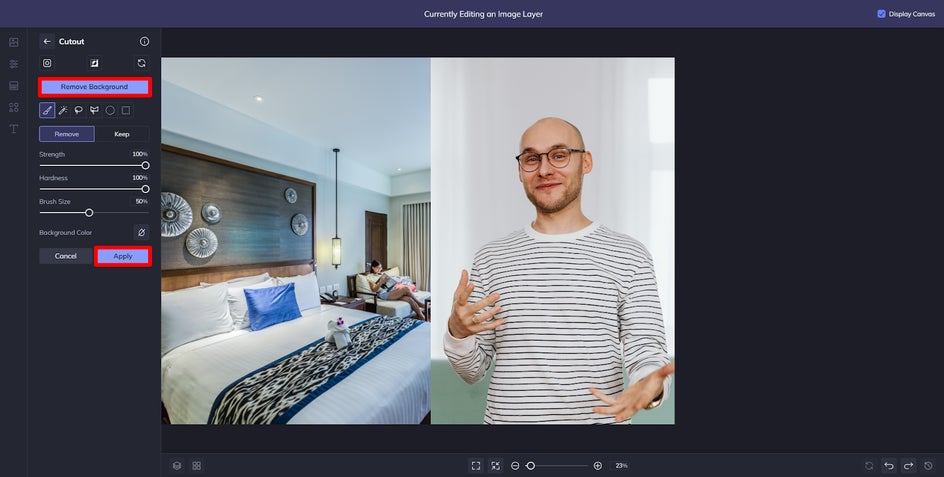
Then, click the Remove Background to automatically detect the background of the image and replace it with transparency. Click the blue checkmark on the pop-up that appears, followed by the Apply button to confirm your selection. Then, simply position this layer to your liking.
Step 5: Add Text
Now, it is time to add a tagline for the video. This can be a quote from the video or an eye-catching description of something that occurred in the video. A quote from this video says, “this could be the number one bedroom in America,” so we are going to use it in the thumbnail.
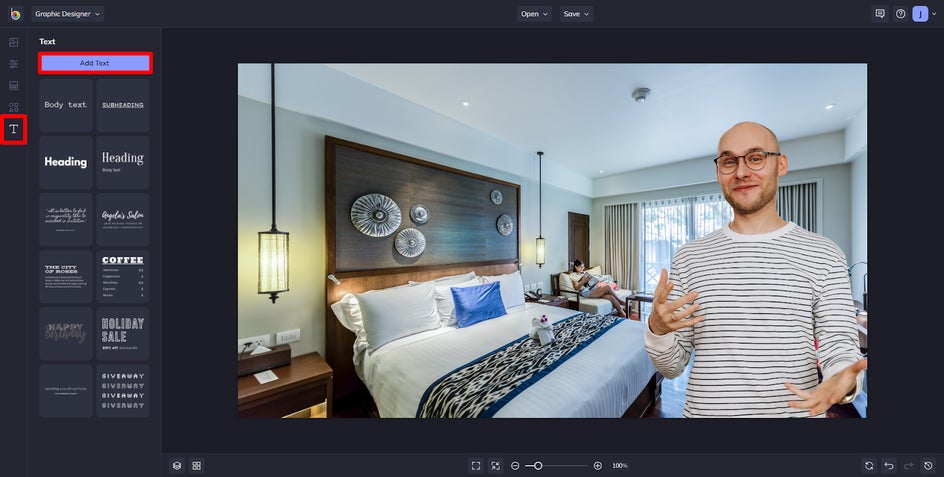
Navigate to the Text tab on the left and click the blue Add Text button that appears. There are many fonts to choose from but it is important to choose one that will be legible when the thumbnail is shrunken. This tutorial uses the Komika Axis font because it is fun and bold.

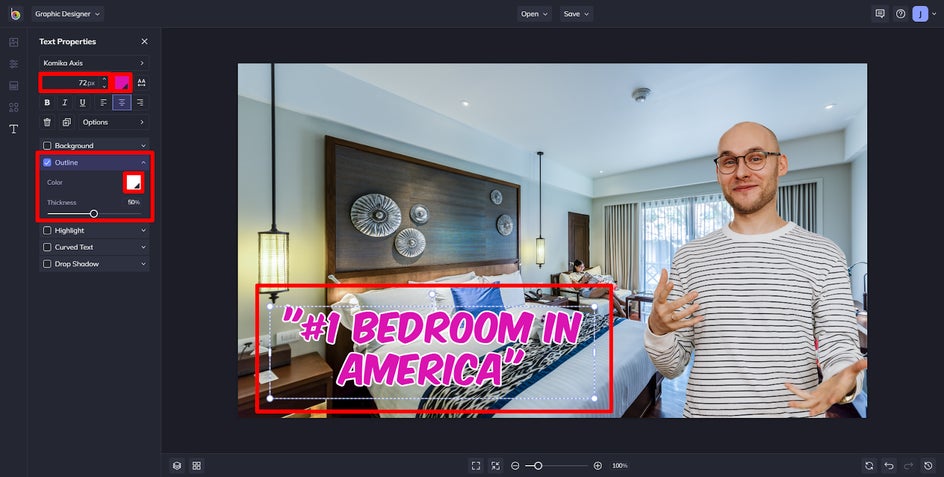
From here, we will use the text editing tools to change the text size so it is big enough to read, in this case, 72px. We will also move the text to somewhere that does not obscure the focus of the video screenshot. The font color will be changed to a color that is exciting and eye-catching, and add a white outline from the Outline dropdown menu, because colored text with a white outline can be read on top of any colored background.
Step 6: Save Your Project
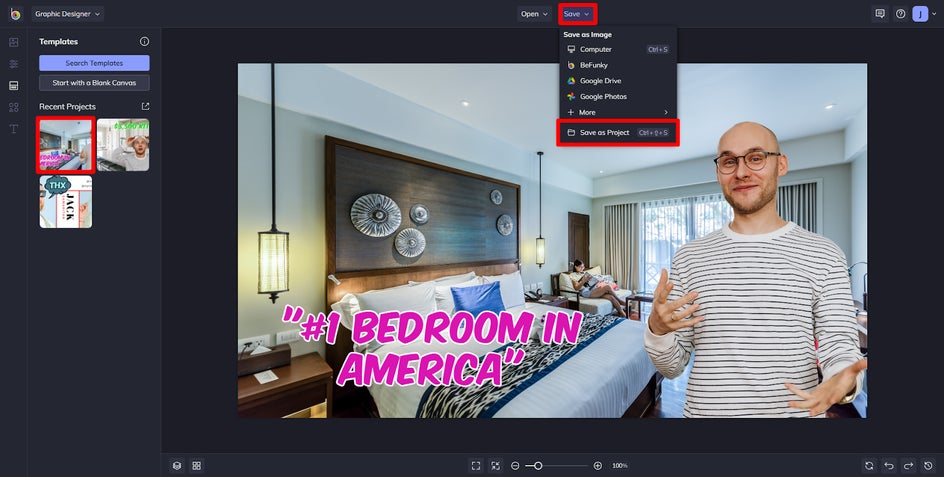
Click the Save button at the top. From the dropdown, select Save as Project. If you save it to BeFunky, you can find it in your Project Manager. By saving it as a project, you have created a template for yourself to make different thumbnails for different videos in your series. Simply change the screenshot, cutout subject, and text by following the same steps outlined above. Don’t forget to save the thumbnail as an image as well so you can use it when you upload your video to YouTube.
Ready for Clicks?
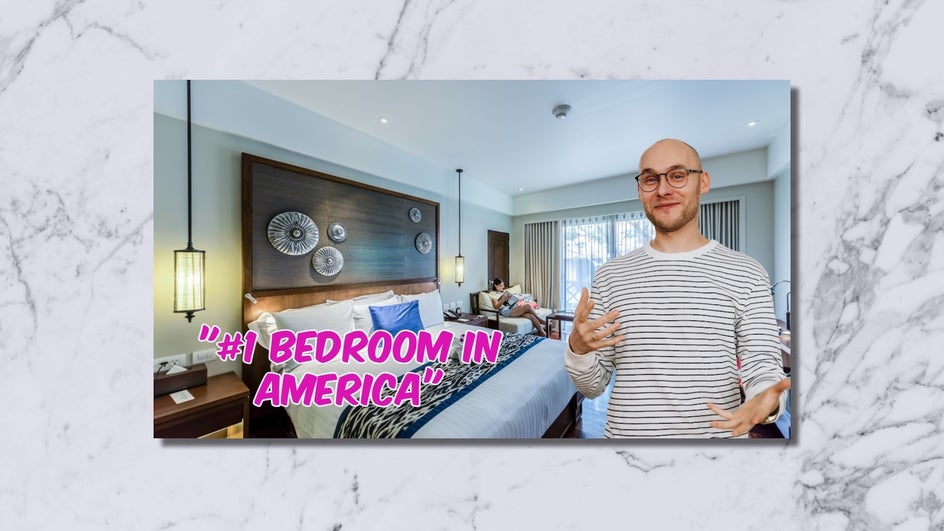
With a completed YouTube thumbnail template, any new video in the series can be finished with a thumbnail based on the original project. Simply add a screenshot from the new video, add a new emotion shot, and change the text. Go one step further by rearranging the images in the thumbnail. Whenever a new video is ready to publish, return to the Designer to begin again.
Customizing Our New Thumbnail Template
Here are some thumbnail examples that can be made for a remodeling series. All you have to do is replace the assets and change up the text!
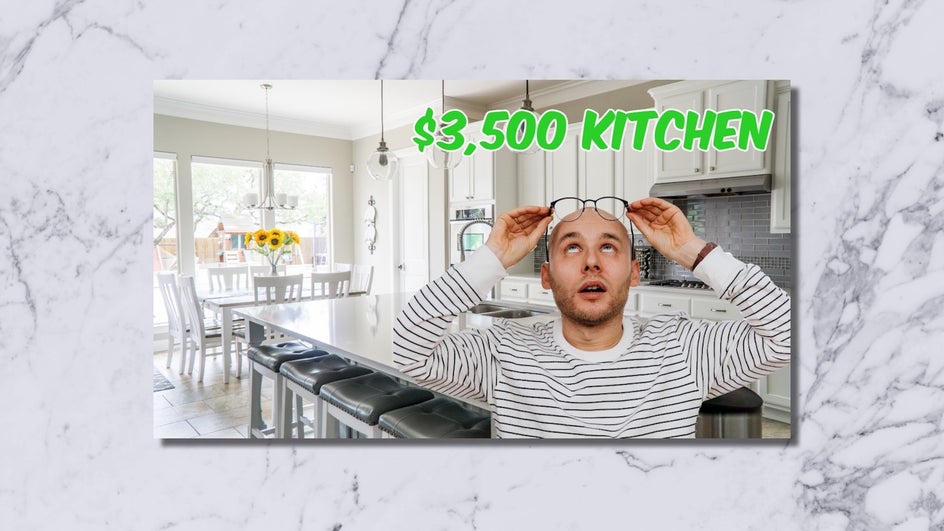
Expensive Kitchen Remodel
In this video, a humble kitchen remodel goes way over-budget. The cost of the kitchen is added in the text and you can see how surprised our YouTuber is.
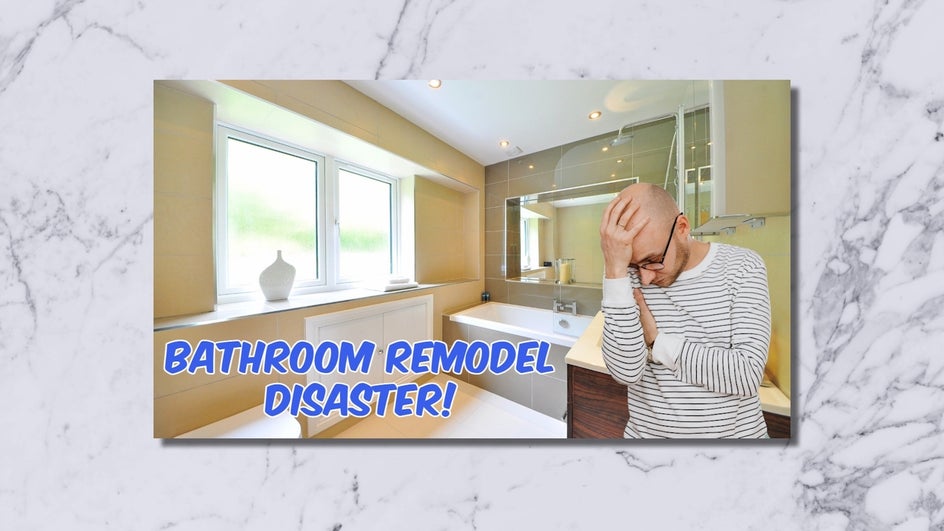
Bathroom Remodel Gone Wrong
In this video, a costly mistake leads a bathroom remodel to take longer than expected. The situation is summarized in the text, and you can see how much it's affected our YouTuber.
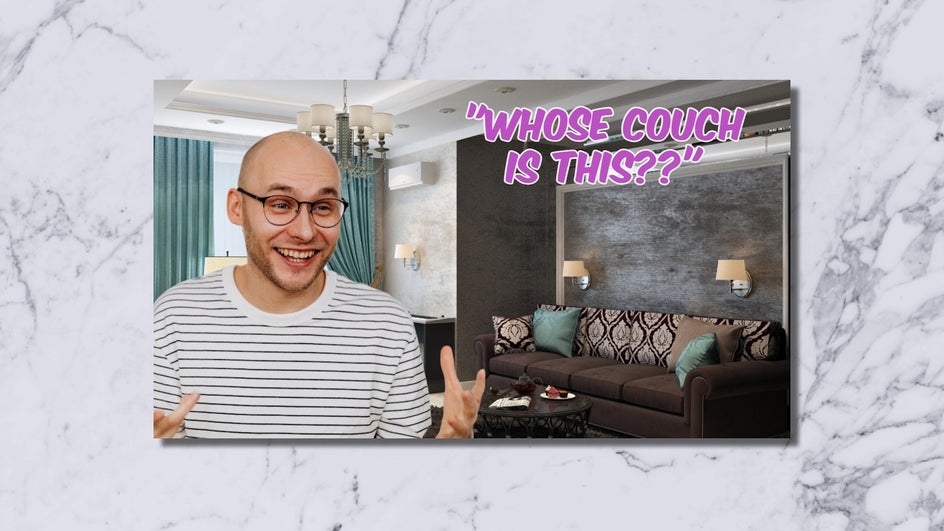
Living Room Furniture Mixup
In this video, two couches were mistakenly swapped at the furniture store, leading to a funny circumstance. A quote is added in the text and our YouTuber looks like he's both amused and confused.
