How to Turn Any Picture Into Pixel Art
Pixel art was born from the earliest days of computer graphics in the 1970s, when computer displays and video game systems had a very limited resolution. The original Pac-Man display was just 288px by 224px, meaning even round shapes had visible square edges. These days, while our screens offer much better quality – your tiny smartphone screen is around 2556px by 1179px – pixel art has remained a niche art form. Its bold shapes and hard edges are unique to the early digital era, and offer a feeling of retro nostalgia.
Historically, creating pixel art is a time-consuming process. Luckily, you can now achieve the pixel art look without the intense hours of work (not to mention the hand cramps) with BeFunky's Pixel Art GFX effect. This one-click pixel art generator takes just seconds to use.
Pixel Art GFX is part of the Cartoon category, a collection of artistic filters designed to help you create art that actually looks handmade. With these photo to cartoon effects, you can create authentic-looking vintage comic art, vector paintings, pop comic drawings, 3D-animated stills, graphic novel panels, and more. These art filters can be used for everything from profile photos to posters to graphic design projects.
In this tutorial, we’ll show you how to use Pixel Art GFX to create your perfect work of art. Let’s get started!
How to Create Your Own Pixel Art
The Pixel Art GFX filter can be found in the Cartoon effects category. Once you’re here, creating your own pixel art is a simple 3-step process.
Step 1: Choose a Photo to Pixelate
The Pixel Art tool is powerful, and can pixelate portraits, animals and pets, landscapes, and more. When picking an image to turn into pixel art, make sure that you use a high-quality photo with a good amount of contrast. If the image is blurry, you can always use the Deblur tool. If it’s hard to pick out details, you can adjust the exposure or use the Denoise tool.
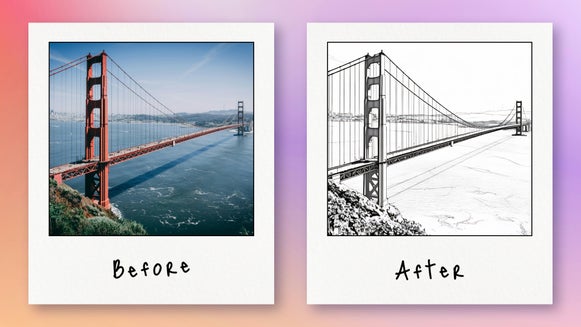
Once you’ve chosen a photo and uploaded it to the Photo Editor, click the Pixel Art GFX effect to pixelate your image instantly.
If you’re happy with the results of the filter, you can skip to Step 3. But if you’d like to make adjustments to your new pixel art, click the Settings button with the slider icon and move on to Step 2.
Step 2: Customize the Effect
Now’s your chance to modify your pixel artwork and really make it your own. Each adjustment slider makes slight tweaks to the pixel filter. A higher Fidelity will provide pixelated results closer to your original image, while a lower fidelity gives the AI more room to play around for a more authentic pixel art style. The Smoothness slider affects the transitions between different colors and values. And Variation simply offers 5 slightly different pixel art variations on the same image.
Different slider combinations can result in completely different works of art. Let your creativity shine and play around with adjustments until you find a combination that looks good to you.
Step 3: Save Your Pixel Artwork
And that’s it: You’ve created your very own piece of pixel art in just a few clicks. Now it’s time to Save your newly pixelated image by clicking the button at the top of the page. You can save as a high-quality PNG for digital purposes, or a print-quality PDF for printing.
Your new pixel artwork can be used as a social media profile picture, website header, framed piece of art for your wall, or even a party invitation – the possibilities are endless!
Cartoon Art Inspiration for Your Next Project
In addition to Pixel Art, the Cartoon effects category has plenty of artistic comic and cartoon filters. Make any photo look like an animated still, a gritty graphic novel cover, or like it came straight off the page of a Golden Age comic book. Here are just a few ways you can use Cartoon effects to transform your next creative project.
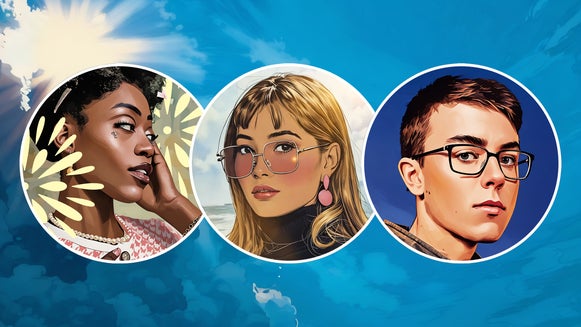
Artsy Profile Pictures
Spruce up your social media presence with vivid colors, bold lines, and textured brush strokes. Cartoon effects can turn any profile picture into an eye-catching work of art. This particular example uses the Vector Painting effect.
Pop Comic Posters
Combine the Pop Comic effect with a bold font for a poster that’s a cut above the rest. This midcentury, Warhol-style filter uses bright colors and strong contrast to grab anyone’s attention.
Vintage Comic Wall Art
By applying Cartoon effects to stock photos, you can create wall art for your home for a fraction of the usual cost. This fruit triptych uses the Vintage Comic filter for vivid hues and high shine.
Transform Your Photos Into Pixel Art Today
Whether you're making a retro game-inspired avatar, creating wall art for a friend, or stylizing photos for your next graphic design project, BeFunky makes turning your photos into pixel art effortless and enjoyable. With just a few clicks, you can transform everyday images into nostalgic masterpieces. So dive in, experiment, and let your inner 8-bit artist shine! Start pixelating today in BeFunky’s Cartoon Category.
Is There An App to Pixelate Pictures?
You can use the BeFunky mobile app to pixelate images and turn any photo in your camera roll into a work of pixel art. Just follow this same tutorial on your phone.