How to Take and Edit a LinkedIn Profile Picture
Did you know LinkedIn profiles with professional portraits receive roughly 14 times more profile views and are 36 times more likely to receive a message than those who don’t? With LinkedIn being home to nearly 740 million members, you certainly want to put your best foot (or, face) forward if you want to gain the attention of potential employers.
No matter what look you’re going for with your LinkedIn headshot, BeFunky’s Photo Editor has everything you need to make the best first impression. With easy-to-use photo editing tools to help you with anything from quick edits and filters, to background removal, appearance touch-ups, and more, you’ll be standing out from the sea of LinkedIn profiles in no time!
Tips for Capturing a LinkedIn Profile Photo
Of course, before you use our Photo Editor to perfect your headshot, you’ll need to have captured one in the first place! Before you get your camera ready, here are our top tips to help you snap your best portrait yet.
Consider the format first
Before you plan how you will frame your photo or where you will photograph it, consider the fact that your LinkedIn profile photo (and everyone else’s for that matter) is displayed in a small circle – not a rectangle, as you might initially plan to capture. This means that in order to avoid cropping out any important features, you’ll want to keep a square format in mind for your headshot, ensuring there’s still plenty of empty space around your all-important face.
So, why a square, you ask? LinkedIn pages require a profile photo measuring 400 x 400 pixels (which they then crop into a circle to display), so sticking to that 1:1 ratio is necessary!
Focus on the face
It might be tempting to upload that holiday snap of you standing on the peak of a mountain, far away, but it’s best you save that on for the ‘gram! This is because your LinkedIn profile photo is all about your face, which we recommend should take up a large majority of the overall image. You want your connections and potential employers to gain a clear sense of who you are, so don’t leave them guessing!
Aim for approachable and friendly
Keep in mind that you can still look professional without having a stern and serious look on your face. Employers are interested in hiring someone who they think will be an asset to the team, including with their warm and friendly personality. So, say “cheese”, think of your favorite joke, or get a loved one to capture you candidly. Whether you opt for a wide grin or a closed-mouth smile is up to you; simply ensure it’s genuine and welcoming, and you can’t go wrong!
Have professional attire
Because your headshot will be used in a professional setting as your LinkedIn display photo, we recommend donning something a little fancier than your favorite sweatshirt. Of course, you don’t have to suit-up as though you’re going to your best friend’s wedding, but a corporate-style blazer, blouse, or dress shirt will help you make the perfect first impression.
Much of your outfit won’t even appear in your portrait, but we recommend keeping it professional from around the chest and upwards if you really want to shine!
Choose a non-distracting background
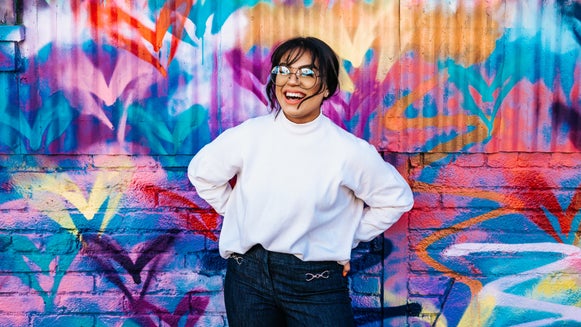
There’s a reason why you’ll notice very few LinkedIn profile photos feature other people or objects in the background; it’s distracting and therefore, causes your profile to get lost in the sea of LinkedIn members. We don’t all have access to bright, white walls that double as a photo backdrop, but thankfully, you don’t really need to. Walk around your neighborhood to find any interesting, yet non-distracting walls that can enhance your portrait – even if they’re in a fun color.
If you’ve already captured the perfect headshot but wish you could remove the background entirely – you can! The Remove Background feature in the Cutout tool in our Photo Editor will do just that, allowing you to replace your background with any shade – including white!
How to Edit a LinkedIn Profile Picture
Once you’re ready to turn your headshot into LinkedIn perfection, head to the Photo Editor and Open your image.
First up, we’re going to Crop the image so it’s the ideal orientation according to LinkedIn specifications. To do this, navigate to Edit in the main menu on the left, followed by Crop. Underneath Aspect Ratio, select Square 1x1, then reposition the selection by dragging it with your mouse, if required. Finally, click the blue checkmark button to apply.
Next, we’re going to Resize the image so it meets LinkedIn’s size requirements of 400 x 400 px. In the Edit menu, click on Resize, which you’ll find underneath Crop. Type in your desired measurements in the Width and Height boxes. Then, just click the blue checkmark button to apply these changes.
Now that our image is perfectly oriented and resized for LinkedIn’s specifications, it’s time to get creative! In this image, the background isn’t as professional as we’d like, so we’re going to remove the background and replace it with a plain white one. To do this, locate Cutout in the Edit menu, then select Remove Background.
Then, next to Background Color, select a color of your choice from the color palette. You can also type in your desired color’s HEX Code, if you know it, or use the Eyedropper tool if you wish to replicate a color already present in your photo. Once you’re happy with your new background, click the blue checkmark button.
A Cutout Options box will then appear, from which you can select Trim Transparency or Export as Layer, should you wish.
Next up, we’re going to enhance our portrait further using the Touch Up tools, which you can navigate to in the main menu on the left. We’re starting with the Perfect Skin tool to give our portrait a subtle ‘airbrushed’ look. This helps to even-out any imperfections or shiny skin. After you’ve clicked on the effect, you can adjust its Strength, Brush Size, and Brush Hardness by clicking and dragging the sliders under each. To apply the effect, click and brush it on using your mouse.
We’re also going to use the Lipstick tool, also located in Touch Up, to give our subject’s lips a pop of color. To do so, choose your lip color desired shade up the top, or click on the first box to select an entirely new shade from the color palette. You can also adjust the effect’s Strength, Brush Size, and Brush Hardness by adjusting the sliders under each. Simply paint the effect on using your mouse, then click the blue checkmark to apply.
Finally, we’re going to utilize the Photo Editor’s wide range of photo effects to add the finishing touch on our portrait. To access these, click Effects in the main menu on the left, then browse the categories to see which Effects take your fancy.
For this image, we’ve used Warmer Tones 11, found in the Warmer Tones category. When you click on an effect, you’ll notice you have three options: Settings, which allows you to adjust elements of the effect such as Highlight, Shadows, and more; Cancel, which cancels the selected effect; and Apply, which applies the selected effect. There is also a slider located underneath these options, which allows you to increase or decrease the selected effect.
Once you love how your LinkedIn portrait looks, it’s time to save your image so it’s ready to upload to your LinkedIn profile! Click Save at the top of the screen, then select your desired save location and format. You can save your image to BeFunky as a project, incase you want to make any edits to the photo later.
Before and After
Don’t let a lack of good camera equipment or editing skills stop you from having a standout LinkedIn profile portrait. Thanks to BeFunky’s easy-to-use Photo Editor, you’ve got all of the tools you need to gain the attention of potential employers!